# computed处理
处理computed相关的逻辑,发生在initState中,接下来我们详细分析与computed相关的逻辑。
export function initState (vm: Component) {
  // 省略代码
  const opts = vm.$options
  if (opts.computed) initComputed(vm, opts.computed)
}
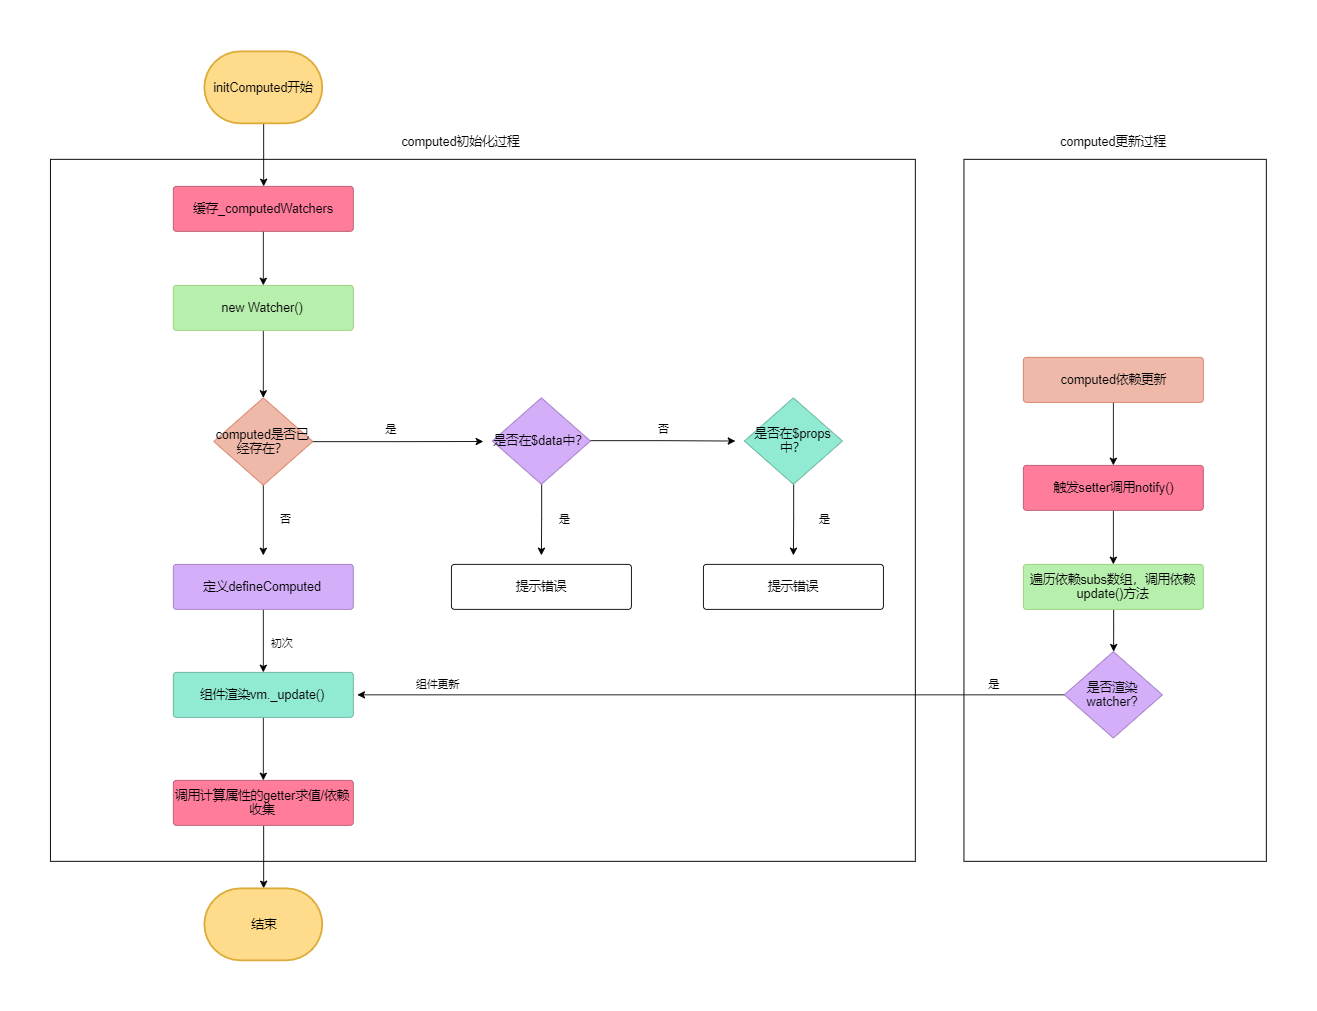
我们知道computed计算属性是依赖于其它响应式变量的,因此我们分析computed的时候会分为两个步骤:computed初始化和computed更新。
# computed初始化
在initState()方法中如果我们传递了computed,那么会调用initComputed()方法。initComputed()方法定义在src/core/instance/state.js文件中,其代码如下:
const computedWatcherOptions = { lazy: true }
function initComputed (vm: Component, computed: Object) {
  // $flow-disable-line
  const watchers = vm._computedWatchers = Object.create(null)
  // computed properties are just getters during SSR
  const isSSR = isServerRendering()
  for (const key in computed) {
    const userDef = computed[key]
    const getter = typeof userDef === 'function' ? userDef : userDef.get
    if (process.env.NODE_ENV !== 'production' && getter == null) {
      warn(
        `Getter is missing for computed property "${key}".`,
        vm
      )
    }
    if (!isSSR) {
      // create internal watcher for the computed property.
      watchers[key] = new Watcher(
        vm,
        getter || noop,
        noop,
        computedWatcherOptions
      )
    }
    // component-defined computed properties are already defined on the
    // component prototype. We only need to define computed properties defined
    // at instantiation here.
    if (!(key in vm)) {
      defineComputed(vm, key, userDef)
    } else if (process.env.NODE_ENV !== 'production') {
      if (key in vm.$data) {
        warn(`The computed property "${key}" is already defined in data.`, vm)
      } else if (vm.$options.props && key in vm.$options.props) {
        warn(`The computed property "${key}" is already defined as a prop.`, vm)
      }
    }
  }
}
代码分析:
- 在
initComputed()方法中,首先定义了一个_computedWatchers的变量,这个变量的作用是缓存当前实例所有计算属性的watcher。 - 接下来遍历所有的
computed,然后对每一个computed进行类型判断,如果是function类型,那么直接使用,如果是对象则代表是get/set形式,则直接取get。如果最后获取到的computed的getter为null,则在开发环境下提示错误。
// 两种类型的计算属性
export default {
  props: ['index'],
  data () {
    return {
      firstName: 'first',
      lastName: 'last'
    }
  },
  computed: {
    fullName () {
      return this.firstName + this.lastName
    },
    active: {
      get: function () {
        return this.index
      },
      set: function (newVal) {
        this.$emit('update:index', newVal)
      }
    }
  }
}
以上面代码为例,两种类型的computed获取到的getter分别如下:
// function类型
const getter = function () {
  this.firstName + this.lastName
}

// get/set类型
const getter = function () {
  return this.index
}
- 然后在非
SSR服务端渲染的情况下,会在_computedWatchers上新建一个Watcher的实例。以上面代码为例,_computedWatchers在遍历完毕后,可以用如下代码表示:
// 当前vm实例
{
  _computedWatchers: {
    fullName: new Watcher(),
    active: new Watcher()
  }
}
- 最后、首先判断了当前遍历的
computed是否已经在vm实例上,如果不在则调用defineComputed()方法,如果在还需要判断当前遍历的computed是否和props、data命名冲突,如果冲突则提示错误。 注意:对应子组件而言,这个时候当前遍历的computed已经在vm实例上了,所以并不会调用defineComputed()方法,我们从上面代码注释也能看的出来。对于子组件而言,真正initComputed的过程是发生在Vue.extend方法中:
Vue.extend = function (extendOptions) {
  // 省略代码
  const Super = this
  const Sub = function VueComponent (options) {
    this._init(options)
  }
  Sub.prototype = Object.create(Super.prototype)
  Sub.prototype.constructor = Sub

  // 初始化子组件的computed
  if (Sub.options.computed) {
    initComputed(Sub)
  }
}

// extend.js中的initComputed定义
function initComputed (Comp) {
  const computed = Comp.options.computed
  for (const key in computed) {
    defineComputed(Comp.prototype, key, computed[key])
  }
}
然后initComputed调用的defineComputed()方法,就和我们现在的defineComputed()方法是同一个方法,它和此时的initComputed()方法定义在同一个位置(src/core/instance/state.js):
const sharedPropertyDefinition = {
  enumerable: true,
  configurable: true,
  get: noop,
  set: noop
}
export function defineComputed (
  target: any,
  key: string,
  userDef: Object | Function
) {
  const shouldCache = !isServerRendering()
  if (typeof userDef === 'function') {
    sharedPropertyDefinition.get = shouldCache
      ? createComputedGetter(key)
      : createGetterInvoker(userDef)
    sharedPropertyDefinition.set = noop
  } else {
    sharedPropertyDefinition.get = userDef.get
      ? shouldCache && userDef.cache !== false
        ? createComputedGetter(key)
        : createGetterInvoker(userDef.get)
      : noop
    sharedPropertyDefinition.set = userDef.set || noop
  }
  if (process.env.NODE_ENV !== 'production' &&
      sharedPropertyDefinition.set === noop) {
    sharedPropertyDefinition.set = function () {
      warn(
        `Computed property "${key}" was assigned to but it has no setter.`,
        this
      )
    }
  }
  Object.defineProperty(target, key, sharedPropertyDefinition)
}
defineComputed()方法的逻辑很简单,根据不同的类型的computed,对sharedPropertyDefinition的get和set进行赋值。sharedPropertyDefinition在之前的proxy中,我们已经介绍过, 它就是Object.defineProperty()方法descriptor参数的一个共享配置。
在非SSR服务端渲染的情况,sharedPropertyDefinition.get的值是调用了createComputedGetter()方法,而在SSR服务端渲染的情况下是调用了createGetterInvoker()方法。我们在分析Vue源码的过程中,因为侧重于Web浏览器端的表现,因此我们接下来会分析createComputedGetter()方法的实现。createComputedGetter()方法和defineComputed()方法定义在同一个位置,代码如下:
function createComputedGetter (key) {
  return function computedGetter () {
    const watcher = this._computedWatchers && this._computedWatchers[key]
    if (watcher) {
      if (watcher.dirty) {
        watcher.evaluate()
      }
      if (Dep.target) {
        watcher.depend()
      }
      return watcher.value
    }
  }
}
我们可以看到createComputedGetter()方法返回了一个函数,这个函数会在获取computed的时候被调用,例如组件渲染的时候:
<template>
  <div>{{fullName}}</div>
</template>
根据以上代码我们再来看computedGetter()方法:组件渲染的时候会获取fullName计算属性,然后调用computedGetter()方法,在这个方法执行的时候,首先判断watcher.dirty属性,这个属性在new Watcher()的时候与我们传入的const computedWatcherOptions = { lazy: true }有关。在Watcher类的构造函数中,有这样一段代码:
class Watcher {
  // 省略代码
  constructor (vm, expOrFn, cb, options, isRenderWatcher) {
    if (options) {
      this.lazy = !!options.lazy
    } else {
      this.lazy = false
    }
    this.dirty = this.lazy
  }
}
因为我们传入的lazy值为true,因此watcher.dirty条件判断为真,进行watcher.evaluate()计算。随后判断了Dep.target为真,则进行依赖收集watcher.depend(),关于依赖收集我们会在之后的章节详细介绍。我们只要知道,当在组件渲染的时候触发的computed依赖收集,收集的是render watcher。最后,我们看一下watcher.evaluate()方法的实现:
class Watcher {
  /**
   * Evaluate the value of the watcher.
   * This only gets called for lazy watchers.
   */
  evaluate () {
    this.value = this.get()
    this.dirty = false
  }
}
evaluate()方法它的实现非常简单,就是触发computed的getter进行求值,然后把dirty设置为false。
# computed更新
在介绍完了computed的初始化后,我们在来看computed的更新过程,以下面例子为例:
export default {
  template: `
    <div>{{fullName}}</div>
    <button @click="change">change</button>
  `
  data () {
    return {
      total: 0,
      firstName: 'first',
      lastName: 'last'
    }
  },
  computed: {
    fullName () {
      if (this.total > 0) {
        return this.firstName + this.lastName
      } else {
        return 'pleace click'
      }
    }
  },
  methods: {
    change () {
      this.total++
    }
  }
}
因为total、firstName和lastName全部为响应式变量,所以fullName这个计算属性初始化的时候,此时total值为0,fullName计算属性有两个Watcher,其中一个是计算属性watcher,另外一个是渲染watcher。当点击按钮触发事件后,会触发total属性的setter方法,进而调用一个叫做notify的方法。
set: function reactiveSetter (newVal) {
  // 省略
  dep.notify()
}
其中notify()是定义在Dep类中的一个方法:
export default class Dep {
   constructor () {
    this.subs = []
  }
  notify () {
    // stabilize the subscriber list first
    const subs = this.subs.slice()
    if (process.env.NODE_ENV !== 'production' && !config.async) {
      // subs aren't sorted in scheduler if not running async
      // we need to sort them now to make sure they fire in correct
      // order
      subs.sort((a, b) => a.id - b.id)
    }
    for (let i = 0, l = subs.length; i < l; i++) {
      subs[i].update()
    }
  }
}
代码分析:
subs就是我们收集起来的watcher,它是一个数组,对应上面案例的话它是一个长度为2的数组并且其中一个为render watcher。- 在
notify()方法调用时,会遍历subs数组,然后依次调用当前watcher的update方法。其中update方法是定义在Watcher类中的一个实例方法,代码如下:
class Watcher {
  // 省略其它
  update () {
    /* istanbul ignore else */
    if (this.lazy) {
      this.dirty = true
    } else if (this.sync) {
      this.run()
    } else {
      queueWatcher(this)
    }
  }
}
当第一次遍历时,此时的watcher为计算属性watcher,我们已经在前面介绍过计算属性watcher它的this.lazy值为true,因此会进行this.dirty = true。
当第二次遍历时,此时的watcher为渲染watcher,对于渲染watcher而言,它的lazy值为false,this.sync为false,因此会调用queueWatcher()方法。我们目前不需要知道queueWatcher是怎么实现的,只需要知道queueWatcher()方法在调用时,会触发updateComponent()方法:
updateComponent = () => {
  vm._update(vm._render(), hydrating)
}
我们可以看到updateComponent()方法调用了vm._update方法,而这个方法的作用就是重新进行组件渲染,在组件渲染的过程中,会再次读取fullName的值,也就是说会调用下面这段代码:
fullName () {
  if (this.total > 0) {
    return this.firstName + this.lastName
  } else {
    return 'pleace click'
  }
}
因为此时的total值为1,所以会返回this.firstName + this.lastName的值,而firstName和lastName又是定义在data中的响应式变量,会依次触发firstName和lastName的getter,然后进行依赖收集。在组件渲染完毕后,fullName的依赖数组subs此时会有四个watcher,分别是三个计算属性watcher和一个渲染watcher。无论这三个计算属性watcher哪一个值更新了,都会再出重复以上的流程,这就是computed更新的过程。
在分析完computed的相关流程后,我们可以得到如下流程图

