# 阿里云 云服务器 ECS CentOS7.0安装Nginx教程
Nginx (opens new window)是一个高性能的HTTP和反向代理服务,许多的大型网站都会采用Nginx来进行HTTP服务器托管,当然我们这里也要采用Nginx,在安装Nginx之前,需要安装一些前置模块
# 准备环境及安装
关于Linux拓展补充
/opt:是用户级的程序目录,可以理解为D:/Software。安装到/opt目录下的程序,它所有的数据、库文件等等都是放在同个目录下面。opt有可选的意思,这里可以用于放置第三方大型软件(或游戏),当你不需要时,直接rm -rf掉即可。在硬盘容量不够时,也可将/opt单独挂载到其他磁盘上使用。
/usr:系统级的目录,可以理解为C:/Windows/。
/usr/lib:理解为C:/Windows/System32。
/usr/local:用户级的程序目录,可以理解为C:/Progrem Files/。用户自己编译的软件默认会安装到这个目录下。
这里主要存放那些手动安装的软件,即不是通过“新立得”或apt-get安装的软件。它和/usr目录具有相类似的目录结构。让软件包管理器来管理/usr目录,而把自定义的脚本(scripts)放到/usr/local目录下面。
# 阿里云CentOS安装Nginx所需环境
# 安装编译环境gcc g++
# 进入到root目录
cd /root/
yum -y install make zlib zlib-devel gcc-c++ libtool  openssl openssl-devel
# 安装PCRE: PCRE功能是让nginx有rewrite功能,下载PCRE
wget http://downloads.sourceforge.net/project/pcre/pcre/8.35/pcre-8.35.tar.gz
# 解压PCRE安装包
tar zxvf pcre-8.35.tar.gz
# 安装PCRE
# 进入安装包目录
cd pcre-8.35

# 编译
./configure

# 安装
make && make install
# 阿里云CentOS开始安装Nignx
# 回到root目录:
cd /root/

# 载nginx安装包
wget http://nginx.org/download/nginx-1.16.0.tar.gz
# 解压安装包
tar zxvf nginx-1.16.0.tar.gz
注意,这里要选好当前解压地址,解压完成就是Nginx所在的目录,这里我们在root根目录下解压。 进入安装目录:
# 编译 安装
# 进入nginx-1.16.0.tar.gz 解压后的文件 nginx-1.16.0
cd nginx-1.16.0

# 编译
./configure  --prefix=/usr/local/nginx/ --with-http_stub_status_module  --with-http_ssl_module

# 安装
 make && make install
编译时不写入 --prefix=/usr/local/nginx 则意味着Nginx会安装到/usr/local/nginx下面 |||| 你可以指定到安装到/root目录下./configure --prefix=/root/nginx
已安装NGINX 首次安装编译Nginx时如果没有添加 --with-http_ssl_module 意味着不能使用https 如何不重新装NGINX操作如下
环境:已安装NGINX。
# 进入到解压后的nginx安装文件下内
cd  /root/nginx-1.16.0

# 重新编译
./configure  --with-http_stub_status_module --with-http_ssl_module

# 安装  切记不要 make install 否则会导致覆盖之前的nginx
make

#备份
cp /usr/local/nginx/sbin/nginx /usr/local/nginx/sbin/nginx.bak

# 拷贝 (make完之后在objs目录下就多了个nginx,这个就是新版本的程序了)
cp -r objs/nginx /usr/local/nginx/sbin/nginx

# 重启
/usr/local/nginx/sbin/nginx -s reload
# 启动和停止Nginx
/usr/local/nginx/sbin/nginx -s stop

/usr/local/nginx/sbin/nginx -s reload
首次开启Nginx 报错 /usr/local/Nginx/logs/Nginx.pid" failed(2:No such file or directory)
/usr/local/nginx/sbin/nginx -c /usr/local/nginx/conf/nginx.conf
使用nginx -c的参数指定nginx.conf文件的位置
如果在修改Nginx参数后 运行时报错 (Found a swap file by the name ".nginx.conf.swp")
那就是因为上次vim的时候,没有完全退出中途产生中断了。解决问题的方式很简单,就是把这个后缀swp的文件删掉就可以了****
cd /usr/local/nginx/sbin/nginx
命令显示出所有文件 (因为 .swp 暂存文件是隐藏文件)
ls -a
执行删除
rm -f .nginx.conf.swp
然后重启服务
/usr/local/nginx/sbin/nginx -s reload
常用Nginx指令
重新载入配置文件 /usr/local/nginx/sbin/nginx -s reload
重启 Nginx /usr/local/nginx/sbin/nginx -s reopen
停止 Nginx /usr/local/nginx/sbin/nginx -s stop
查看ngixn版本极其编译参数 /usr/local/nginx/sbin/nginx -V
检查配置文件nginx.conf的正确性命令 /usr/local/nginx/sbin/nginx -t
# Window如何安装Nginx
- 到
nginx官网下载window版压缩包(作者使用的是nginx-1.14.2)
http://nginx.org/en/download.html
在任意位置解压
nginx压缩包进入
nginx根目录,并在html目录下新建一个文件夹admin文件夹回到
nginx根目录,并进入到conf目录下,找到nginx.conf并打开找到
http域并另起一行,加入如下代码:
sever {
  listen 80;
  server_name xxx.com;#(您的域名)
  location / {
    root html/admin;
		try_files $uri $uri/ /index.html;
		index index.html;
  }
}
- 回到
nginx根目录,双击nginx.exe运行nginx
# Http及Https的有关配置
# 访问本机文件夹的Nginx的配置
通过Nginx配置实现根据不同的客户端访问不同的文件比如H5和PC 并且支持vue静态页面的history路由模式
通过自定义变量实现访问不同的文件夹资源
$terminaltype&root $terminaltype
通过配置try_files可以实现vue静态文件支持history路由模式访问
# 访问文件的配置
server {
        listen       80;
        server_name  www.xmanv.com;
        set $terminaltype html/web-client/pc;
        if ( $http_user_agent ~ (Android|iPhone|iPod|BlackBerry|WindowsPhone|UC|Kindle|Mobile|webOS) ) {
            set $terminaltype html/web-client/wap;
        }
        location / {
            add_header Access-Control-Allow-Origin  *;
            add_header Access-Control-Allow-Credentials  true;
            add_header Access-Control-Allow-Methods  *;
            root $terminaltype;
            index index.html index.htm index.php;
            try_files $uri $uri/ /index.html;
        }
}
TIP
try_files按配置顺序检查文件是否存在,返回第一个找到的文件。结尾的斜线表示为文件夹 -$uri/。如果所有的文件都找不到,会进行一个内部重定向到最后一个参数。
# 代理本机其他接口的配置
通过配置
proxy_pass实现接口的反向代理
# 代理本机其他接口的配置
    server {
        listen       80;
        server_name  api.xmanv.com;
        location ~ /^[H,h][T,t][T,t][P,p][S,s]/ {
            proxy_pass http://127.0.0.1:5614;
            proxy_set_header Host                           $http_addr;
            proxy_set_header X-Real-IP                      $remote_addr;
            proxy_set_header X-Forwarded-For                $proxy_add_x_forwarded_for;
            index index.html index.htm;                     #默认情况
        }
        location / {
            proxy_pass http://127.0.0.1:5614;
            proxy_set_header Host                           $http_addr;
            proxy_set_header X-Real-IP                      $remote_addr;
            proxy_set_header X-Forwarded-For                $proxy_add_x_forwarded_for;
            index index.html index.htm;                     #默认情况
        }
}
# 配置Https支持网站https访问 同时强制用户访问http是跳到https
通过配置
rewrite ^(.*) https://$server_name$1 permanent;实现重定向 其他方法 (opens new window)
# 代理本机其他接口的配置
server {
    listen      443 ssl;
    server_name  www.xmanv.com;
    set $terminaltype html/web-client/pc;
        if ( $http_user_agent ~ (Android|iPhone|iPod|BlackBerry|WindowsPhone|UC|Kindle|Mobile|webOS) ) {
        set $terminaltype html/web-client/wap;
    }
    add_header Access-Control-Allow-Credentials  true;
    add_header Access-Control-Allow-Methods  *;
    root $terminaltype;
    index index.html index.htm index.php;
    try_files $uri $uri/ /index.html;
    }
    ssl_certificate      /root/.acme.sh/xmanv.com/fullchain.cer; #证书地址
    ssl_certificate_key  /root/.acme.sh/xmanv.com/xmanv.com.key; #秘钥地址
    ssl_session_cache    shared:SSL:1m;
    ssl_stapling_verify on;
    resolver 8.8.8.8 8.8.4.4 valid=60s ipv6=off;
    resolver_timeout 5s;
    error_page   500 502 503 504  /50x.html;
    location = /50x.html {
        root   html;
    }
}
server {
    server_name  www.xmanv.com;
    rewrite ^(.*) https://$server_name$1 permanent;
}
TIP
# Nginx配置301重定向
本文讲解 nginx 如何配置重定向跳转。重定向分为 301 永久重定向和 302 临时重定向,本文主要讲解 301 永久重定向。
网站在实际运营中,很可能会有重定向的需求, 如非 www 域名自动重定向为 www 域名, http 地址自动重定向为 https 地址等。
当网站的域名做变更时,通过 301 重定向还可以将旧域名的分数排名转移到新域名。
# http 重定向到 https
# 将"http的www域名"重定向到"https的www域名"
server {
    #http端口
    listen       80;

    server_name  www.sofineday.com;

    access_log /var/log/nginx/www.sofineday.com.access_log;
    error_log /var/log/nginx/www.sofineday.com.error_log;

    return 301 https://www.sofineday.com$request_uri;
}

# 配置https的www域名
server {
    #https端口
    listen       443 ssl;

    server_name  www.sofineday.com;

    access_log /var/log/nginx/www.sofineday.com.access_log;
    error_log /var/log/nginx/www.sofineday.com.error_log;

    #https的证书配置
    ssl_certificate    /etc/nginx/cert/_.sofineday.com.full_chain.pem;
    ssl_certificate_key    /etc/nginx/cert/_.sofineday.com.private.key;

    root /static-file/blog;
}
# 主域名重定向到 www 域名
# 将"http的主域名"重定向到"http的www域名"
server {
    #http端口
    listen       80;

    server_name  sofineday.com;

    access_log /var/log/nginx/sofineday.com.access_log;
    error_log /var/log/nginx/sofineday.com.error_log;

    return 301 http://www.sofineday.com$request_uri;
}

# 将"http的www域名"重定向到"https的www域名"
server {
    #http端口
    listen       80;

    server_name  www.sofineday.com;

    access_log /var/log/nginx/www.sofineday.com.access_log;
    error_log /var/log/nginx/www.sofineday.com.error_log;

    root /static-file/blog;
}
# 将"主域名或 http 域名"都重定向到 https 的 www 域名
提示
推荐该方案,终极方案,考虑得最完善! 做 seo 优化时,需要考虑该方案,详见seo 重定向
# 将"http或https的主域名"重定向到"https的www域名"
server {
    #http端口
    listen       80;
    #https端口
    listen       443 ssl;

    server_name  sofineday.com;

    access_log /var/log/nginx/sofineday.com.access_log;
    error_log /var/log/nginx/sofineday.com.error_log;

    #https的证书配置
    ssl_certificate    /etc/nginx/cert/_.sofineday.com.full_chain.pem;
    ssl_certificate_key    /etc/nginx/cert/_.sofineday.com.private.key;

    return 301 https://www.sofineday.com$request_uri;
}

# 将"http的www域名"重定向到"https的www域名"
server {
    #http端口
    listen       80;

    server_name  www.sofineday.com;

    access_log /var/log/nginx/www.sofineday.com.access_log;
    error_log /var/log/nginx/www.sofineday.com.error_log;

    return 301 https://www.sofineday.com$request_uri;
}

# 配置https的www域名
server {
    #https端口
    listen       443 ssl;

    server_name  www.sofineday.com;

    access_log /var/log/nginx/www.sofineday.com.access_log;
    error_log /var/log/nginx/www.sofineday.com.error_log;

    #https的证书配置
    ssl_certificate    /etc/nginx/cert/_.sofineday.com.full_chain.pem;
    ssl_certificate_key    /etc/nginx/cert/_.sofineday.com.private.key;


    root /static-file/blog;
}
# Nginx配置gzip压缩
本文讲述 nginx 支持 gzip 压缩的配置方法。大文件的访问不仅会浪费服务端的带宽流量,也会浪费用户端的带宽流量,并且还会影响传输速度,从而影响用户体验。
所以对于大文件,应该采用 gzip 压缩,减少文件传输大小、减少带宽占用、提高文件加载速度、提升用户体验。
- 打开
nginx.conf,并在http模块任意行加入如下代码: 在http,server或location任意模块都可以配置gzip压缩。
gzip  on;
#gizp压缩起点,文件大于1k才进行压缩
gzip_min_length 1k;
# gzip 压缩级别,1-9,数字越大压缩的越好,也越占用CPU时间
gzip_comp_level 9;
# 进行压缩的文件类型, 按需补充即可
gzip_types text/plain application/javascript application/x-javascript text/css application/xml text/javascript;
# 是否在http header中添加Vary: Accept-Encoding,建议开启
gzip_vary on;
- 保存并重启
nginx
window与linux的配置方式完全一致,只需要找到nginx.conf配置文件进行如上操作即可
# nginx封禁IP或IP段
本文讲述 nginx 封禁 IP 或 IP 段的配置方法。若发现我们的网站被某个 IP 频繁非正常访问或被某个 IP 段频繁访问, 那么很可能是爬虫的 IP,我们需要根据实际分析来决定是否要封禁这些 IP,这样这些 IP 就无法访问我们的网站进而无法爬取我们的资源。
TIP
使用 deny 指令封禁 IP, 可以在如下区域配置:
http、server 或 location
#封禁单个 IP
deny 123.45.6.7

#封整个段即从 123.0.0.1 到 123.255.255.254
deny 123.0.0.0/8

#封 IP 段即从 123.45.0.1 到 123.45.255.254 的命令
deny 124.45.0.0/16

#封 IP 段即从 123.45.6.1 到 123.45.6.254
deny 123.45.6.0/24
# 开启OCSPStapling优化https访问性能
本文讲述 nginx 开启 OCSP Stapling 的配置方法, 从而优化 https 的访问性能。因为免费证书的证书校验服务器可能没有国内节点,导致国内用户通过 https 访问站点可能会明显比 http 慢。nginx 开启 OCSP Stapling 即可解决该问题。
https 站点访问慢的原因分析
因为浏览器访问 https 站点时,至少首次访问会去证书校验服务器检验 https 证书, 但是免费证书的校验服务器一般都在国外,导致国内用户访问的时候,会明显感到慢,甚至经常出现网络错误。
不同的客户端设备的 https 证书校验机制又不尽相同。例如 android 设备会在首次访问 https 站点时,把证书缓存在本地,后续访问就不会去访问校验服务,导致 android 上访问很流畅,但是 ios 设备却体验特别差,甚至压根没法用。
为了解决免费 https 证书访问慢的问题,有个解决方案:OCSP Stapling。
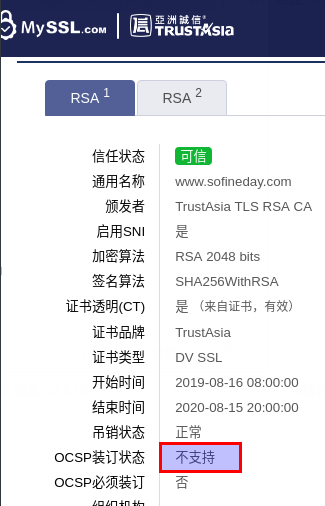
# 检查证书是否已开启 OCSP Stapling
- 检查证书是否已开启 OCSP Stapling
openssl s_client -connect sofineday.com:443 -servername sofineday.com -status -tlsextdebug < /dev/null 2>&1 | grep "OCSP"
- 若显示如下结果,则表示已开启
OCSP response:
OCSP Response Data:
    OCSP Response Status: successful (0x0)
    Response Type: Basic OCSP Response
- 若显示如下结果,则表示未开启
OCSP response: no response sent
- 前往 myssl.com (opens new window) 网站 查看
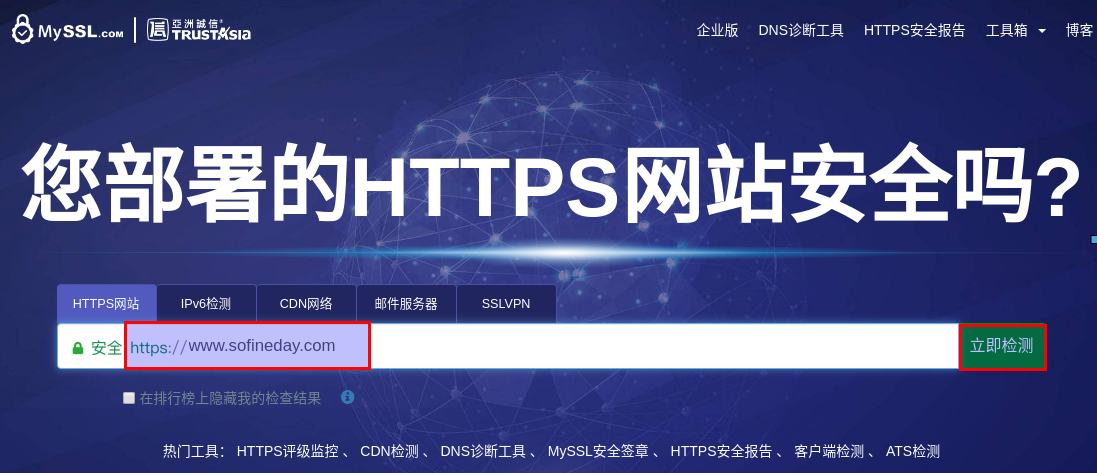
若没有开启 ocsp, 显示如下
若已开启 ocsp,显示如下
# 开启 nginx 的 OCSP Stapling 配置
此处只给了 Let's Encrypt 证书的 oscp 配置
若您使用的是其它品牌的证书,配置方法不同,请自行查找教程。
在原有的 https 配置基础之上,加入如下 4 行配置即可
ssl_stapling on;
ssl_stapling_verify on;
resolver 8.8.8.8 8.8.4.4 valid=60s ipv6=off;
resolver_timeout 5s;
# 负载均衡
有效处理服务器高并发,同时也适用于平滑部署
- 打开
nginx.conf,并在http模块任意行加入如下代码:
upstream xuanzai {
	server xxx.com weight=10; # 服务器1
	server xxx.com weight=10; # 服务器2
}
- 配置
server模块
server{
	listen 80;
	server_name xzadmin.xuanzai.top; # 暴露给用户访问的域名
	location / {
		proxy_pass http://xuanzai; # 名称与负载均衡配置的名称一致
		proxy_redirect default;
		index index.html;
		root html;
	}
}
- 保存并重启
nginx
这样,简单的负载均衡就配置完成了!
此时如果两个(或多个)服务器已开启,那么可尝试访问已配置好的域名,查看是否配置成功
window与linux的配置方式完全一致,只需要找到nginx.conf配置文件进行如上操作即可
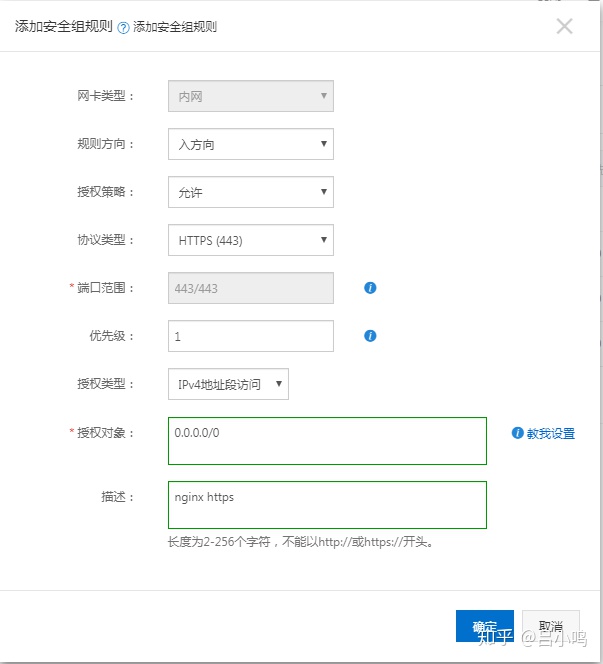
# 修改阿里云组策略
WARNING
注意,在开启nginx的http和https服务后,需要在阿里云的云服务器实例安全组策略中添加80端口和443端口的开启。
TIP
如果要使用其他端口都需要在安全组里进行配置(一个阿里云账号下的多台esc服务器 都是配在同一个地方)
找到实例中的安全组配置:
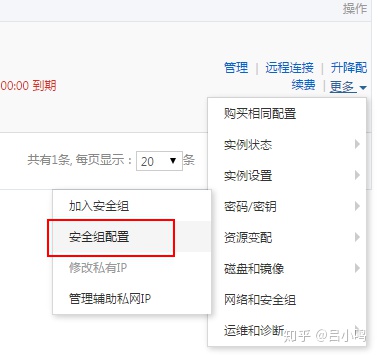
进入之后,点击添加安全组配置:
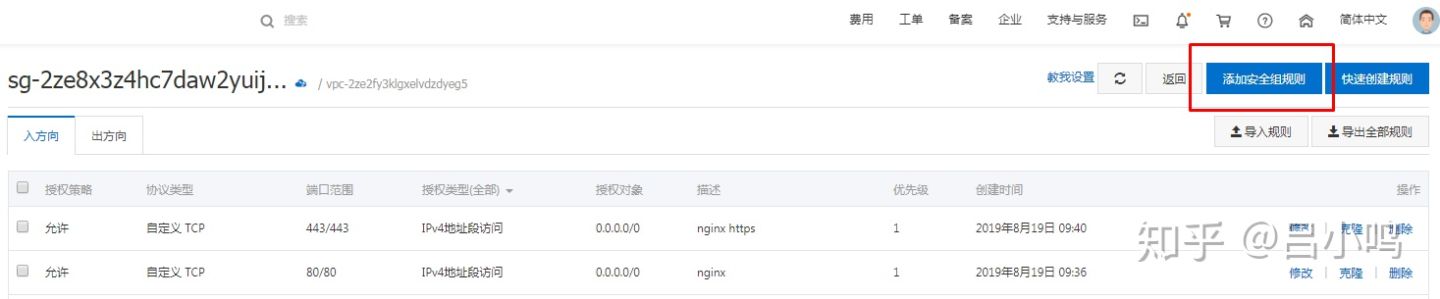
添加http的80端口:

添加https的443端口: